One of the most commonly added skills in Microsoft Copilot Studio agents is the ability to send emails, whether through the Office 365 Outlook connector, the Office 365 Outlook MCP server, Gmail, or similar tools. But if you've ever added one of these connectors to your agent, you've probably been disappointed by the results: a total lack of formatting in emails sent by Copilot Studio.
You were hoping your agent would send beautifully formatted emails with colors, tables, bullet points, and professional signatures. Instead, you got plain text with no formatting, everything collapsed into a single block of text.
This guide shows you exactly how to get your Copilot Studio agent to send professional, HTML-formatted emails that look polished and are easy to read. The steps are simple, and you can start applying them immediately.
The Problem: Plain Text Emails from Copilot Studio
When you first configure a Copilot Studio agent to send emails using a standard connector like Office 365 Outlook, the agent will generate content and send it. But without specific instructions, the email arrives as plain text with no formatting.
Even if the agent appears to apply line breaks or structure in the Copilot Studio interface, most email clients will not render those line breaks or formatting unless the email is sent as HTML. The result is a wall of text that's hard to read and unprofessional.
So how do you fix this? You can either watch the full tutorial, or continue to read this with step-by-step instructions
Watch the Full Tutorial
Solution 1: Simple HTML Formatting with Basic Instructions
The easiest way to improve your agent's email formatting is to add a simple instruction in your agent's system instructions:
"Always apply HTML formatting to emails that you send."
This zero-shot single instruction tells the agent to use HTML tags when composing the email body. You can also add a second instruction to customize the signature:
"Apply a signature to emails you send: Best Regards,
system.bot.name"
For example, you can instruct the agent to use:
- Line breaks
- Bold formatting
- A variable like
system.bot.nameto dynamically insert the agent's name
With these two instructions, your agent will start sending emails with:
- Bullet points
- Bold and regular fonts
- Line breaks that render correctly in email clients
- A professional signature
This makes the email much more readable and professional, even without advanced styling.
Solution 2: Advanced HTML Formatting with Detailed Instructions
If you want your emails to look truly polished with colors, tables, banners, and custom branding, you need to provide more detailed instructions to your agent.
Here's an example of a structured set of instructions you can add to your agent's system instructions.
Download the Instructions discussed in steps below from AJ Ansari's GitHub repository.
This example uses a process titled "Email Formatting" with multiple steps:
Step 1: Always apply HTML formatting
Instruct the agent to use HTML tags and apply color as needed. For example, you can specify your corporate colors with HTML color codes:
- Primary color:
#FF6600(orange) - You could add a secondary color like light grey with the appropriate HTML color code
Also instruct the agent to use bold, italics, and underline where appropriate.
Step 2: Apply a banner box at the top of the email
Instruct the agent to always include a banner box with rounded corners at the top of the email. The banner should include:
- A bold headline summarizing the email's purpose
- Color coding based on the message type:
- Green for positive messages
- Yellow for alerts or warnings
- Light blue for neutral information
- Red for urgent or negative messages
- An icon (such as a checkmark, warning icon, or information icon) to make the banner more eye-catching
This banner immediately tells the recipient what the email is about and sets the tone.
Step 3: Use numbered or bulleted lists as appropriate
Instruct the agent to break down information into lists where it makes sense, making the content easier to scan and understand.
Step 4: Format financial amounts consistently
If your emails include financial data, provide specific formatting rules:
- Always prefix amounts with a currency symbol (e.g., $)
- Always use two decimal points (e.g., $1,234.56)
- Show negative numbers in parentheses or with a minus sign, depending on your preference
Step 5: Highlight important information with a styled box
For key information that needs to stand out, instruct the agent to use a box with:
- A light gray or neutral colored background
- A colored border on the left side only (using one of your corporate colors)
This draws the reader's attention to critical details without overwhelming the design.
Step 6: Use table-based layouts and inline styles
For best compatibility across email clients, instruct the agent to:
- Use table-based layouts
- Apply inline styles (not external CSS)
If the email includes a data table, specify:
- Use your corporate color for row headers
- Use alternating row shading for readability
- Make column headers bold
- For numerical columns, show totals where appropriate
Step 7: Apply a professional signature
Instruct the agent to include a signature with:
- Line breaks and bold formatting
- The agent's name (using a variable like
system.bot.name) - Your company name
Step 8: Display a confirmation message
After sending the email, instruct the agent to display a confirmation message in the chat so the user knows the email was sent successfully.
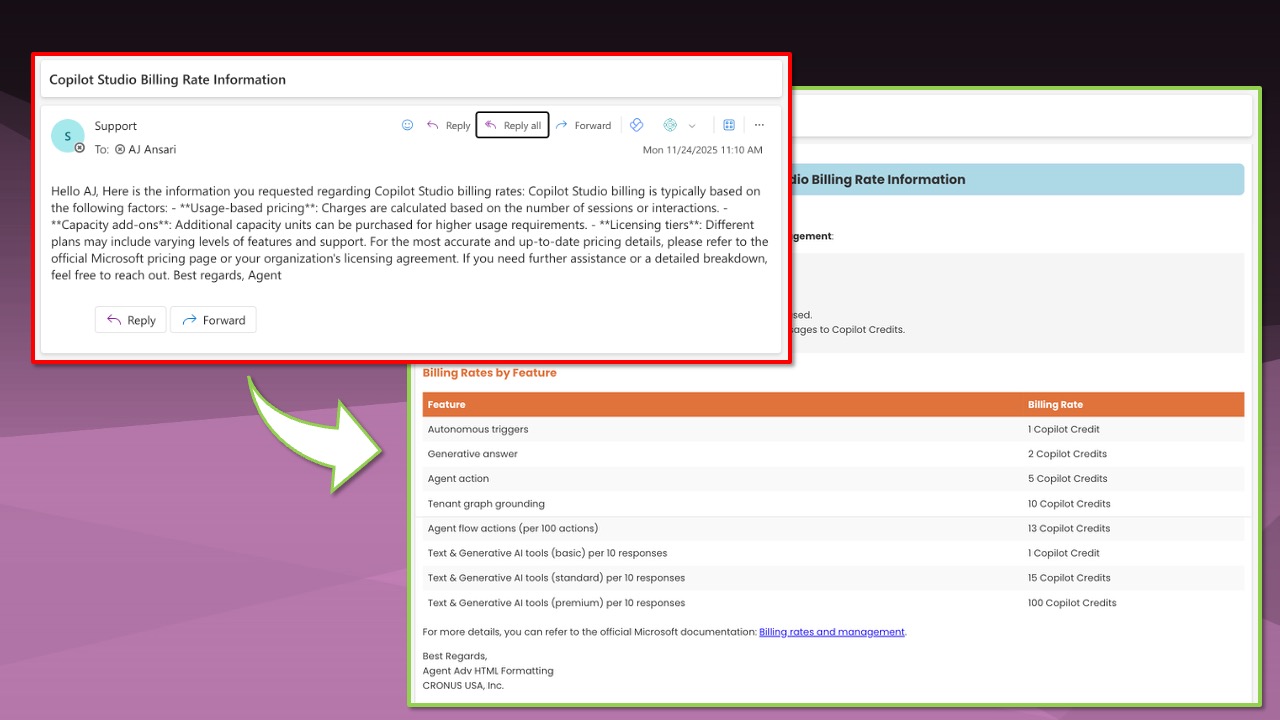
Real-World Example: Sending a Customer Balance Report
To see these instructions in action, consider an example where you ask your agent to:
"Email me a list of customers as a table with customer name, salesperson code, and balance due amount."
With the advanced HTML formatting instructions in place, the agent will:
- Pull live customer data from your system (for example, using a Business Central MCP tool or connector).
- Generate a professional email with:
- A banner at the top with a headline like "Customer Balance Due Report" and an information icon
- A well-formatted table with alternating row colors, bold column headers, and your corporate color for the header row
- Currency amounts formatted with dollar signs and two decimal points
- A total row at the bottom of the table
- A professional signature with your company name
- Send the email and display a confirmation message in the chat.
The result is a polished, professional email that looks like it was crafted by a human, not a bot.
Key Takeaways for Formatting Copilot Studio Emails
To transform your Copilot Studio agent's emails from plain text to professional HTML-formatted messages:
- Start simple: Add a basic instruction like "Always apply HTML formatting to emails that you send."
- Customize the signature: Use variables like
system.bot.nameand include your company name. - Go advanced: Create a detailed "Email Formatting" process with step-by-step instructions covering banners, colors, tables, lists, and highlights.
- Use inline styles: For best email client compatibility, use table-based layouts and inline CSS.
- Test and iterate: Send test emails to yourself and refine your instructions based on how they render in different email clients.
To see these formatting techniques in action and follow along step-by-step, watch the full tutorial video on YouTube (scroll to the top of this article to watch the video. Don't forget to hit the Like and Subscribe button!)
Author and AI Assistance Disclosure
This article is based on my original YouTube video tutorial on formatting emails in Copilot Studio. I used AI to help turn the video transcript into a structured, edited article, but the techniques, examples, and recommendations are my own and reflect my personal experience building Copilot Studio agents.
Recommended Reading
If you liked this post, check out these similar posts: